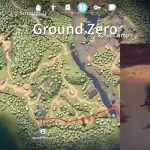
The Warehouse Area is the second major map in Escape from Duckov. It offers a spacious, rural environment with wide open sightlines and frequent patrols. As one guide notes, it features “wider sightlines, heavier patrols, and mid-tier quest routes”. Entry into Warehouse from Ground Zero requires explosives: the northern forest wall must be blown open with a grenade or dynamite (or skipped via a hidden key door). Once inside, clear the path carefully: a workshop-style complex and wooded camps lie ahead. Importantly, the Warehouse teleport beacon is located at the east Gas Station (adjacent to an extract point) – activate it on your first run to unlock fast-travel for all future runs. The map contains 6 extract points, 6 major labeled areas, and dozens of loot spawns (67 containers, 21 toolbox spawns, etc.), so map knowledge and planning are key.
Key Landmarks and Zones
- Western Factory (central-west): The largest facility on the map, a walled multi-building complex. It has multiple locked entrances (north and south) and interior safes. Inside are numerous workbenches and toolboxes brimming with parts and craft materials. The far-left (west) corner of this factory reliably spawns multiple ammo boxes and a weapon crate – prime loot if you can secure it. A hidden cellar entrance lies outside the western fence, requiring the generic Cellar Key to open.
- Ravine & Farmhouse (southwest): A cluster of rural houses and a stream-marked “Ravine” area. One large farmhouse here conceals a trapdoor to a toxic cellar (the Hidden Secret quest). This cellar requires a gas mask to enter safely. Loot in this zone includes farming supplies and occasional stash caches.
- Gas Station & East Road Camp (east): A gas station building and adjacent farm fields with sheds. This eastern hub hosts the teleport beacon (fast-travel point) and one of the extraction points. It often has vending machines, ammo piles, and hidden stashes near the road. The nearby East Road Camp is a small POI with crates and clothing spawns.
- Cracked Wall (north): The blasted gap in Ground Zero’s northern wall is the only easy entry from Ground Zero. It must be opened with an explosive. After breaching, you arrive near a pond-side camp. An alternate northern entrance exists via the Western Factory’s locked doors if you find a Factory Access Card.
- Lumber Mill (southeast): A wood-processing mill at the map’s southeastern corner. It serves as a common extraction point (notably for the “Warehouse Route” quest). Crates and tools around the Lumber Mill also make it a lootable area on a successful run.
Loot Spawns and Container Types
Warehouse Area is loot-dense. The number of high-value containers is large: 67 general loot containers and 21 toolbox/tool chest spawns are scattered across the map. Prioritize these loot types:
- Clothing Containers (Jackets, Backpacks): Every spawn of duck jackets or backpacks can hide keys, pocket loot, or quest items. These are some of the most reliable sources for keys and small loot. Always check pockets and backpacks in camps and houses first.
- Ammo Boxes & Weapon Crates: Especially in the Western Factory. The factory’s western perimeter consistently has stacks of ammo boxes (and even a weapon crate). These crates yield bulk ammunition, weapon parts, and occasionally high-tier guns. Check all visible crates around trucks, fields, and shop counters.
- Toolboxes and Workbenches: Inside the factory buildings, sheds, and shops. These usually contain crafting parts (like circuits, boards) and sometimes weapon attachments. Always smash open tool chests in main buildings.
- Medical and Tactical Crates: Found in military-style camps or near roads. Each spawn can have medkits, bandages, and grenades. Don’t overlook first-aid and utility crates along patrol routes.
- Safes and Lockers: Some locked rooms (e.g., Western Factory offices) hide safes. These require keys (or lockpicks) but often contain blueprints, cash, or rare gear.
- Hidden Stashes and Dig Spots: Look for concrete floor markers or subtle prompts. (The Ravine farmhouse and Western Factory cellar hide additional loot once unlocked.) Dig spots (using a shovel) appear near electric towers, riverbanks, and camps, sometimes yielding rare components and consumables.
- Special Loot: The map includes 9 blueprint spawns and several quest items. For example, Farming supplies and flower pot items appear in sheds and houses. The total loot count (67 containers, 11 ammo boxes, 8 tactical boxes, 8 medical, 21 toolboxes, etc.) guarantees plenty to loot.
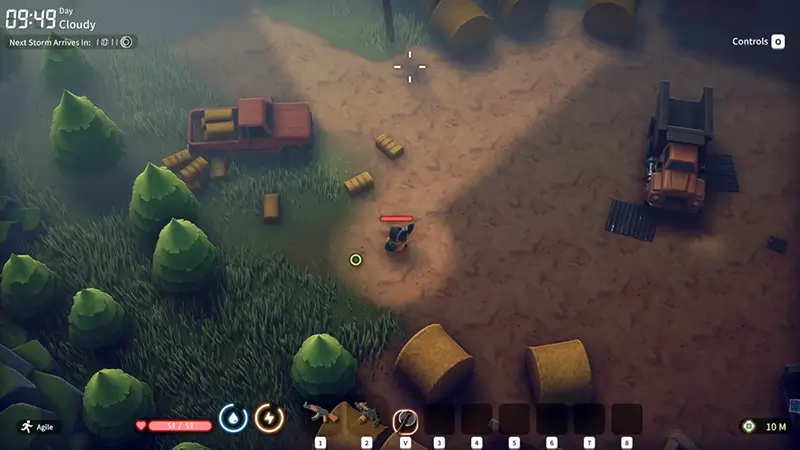
*Image: A player forages a farm zone in the Warehouse Area. Open rural areas (hay bales, trucks) often conceal ammo crates and loot caches.
Treasure can be found even in fields and behind trucks. For instance, the hay-bale fields and vehicles near the East Camp frequently spawn hidden stash spots. The picture above illustrates a typical farm clearing: every hay stack or log pile could contain spare ammo or parts. In practice, every container and stash should be looted on the first pass: with 67 loot containers on the, missing one means lost value.
Recommended Loot Routes (Rotations)
Efficient runs follow a clear circuit. Here are sample routes for different goals:
- General Loot Sweep: Enter via the cracked wall (or hideout wormhole shortcut). First, clear the nearby pond camp for ammo and jackets. Move into the Western Factory: sweep from the south gate through the interior rooms, hitting every bench and chest, then slip outside to clear the western fence corner (ammo boxes!). Next, head east to the Gas Station/East Camp area: activate the teleport beacon (if new) and loot the fuel station booths. If time remains, circle north to the farmland houses for extra jackets and parts. Finally, extract via the Lumber Mill (southeast) or back through the Gas Station exit.
- Key-Farming Run: Immediately hunt clothing containers. Loop through all residences and camps – jackets, parkas, and cabinets are prioritized. Check the Ravine farmhouse (for the cellar key) and the factory offices. If you gather keys, return via the closest exit. If not, repeat for another run.
- Boss/PVP Route: If expecting a boss or others, you might rush to the boss spawn zones. For example, led squads often appear in the Western Factory’s farm area. One tactic is to clear the West Factory quickly (and eliminate the Speedy Group Commander), then fall back toward the Gas Station under cover. This is high-risk and not recommended for casual looting.
In all rotations, plan for two extract points. The Gas Station (east) and Lumber Mill (southeast) are the primary extracts, but secondary roads and side gates exist. Always carry grenades to clear chokepoints quickly.
Enemies and Boss Spawns
Warehouse Area is heavily patrolled by NPC squads and bosses:
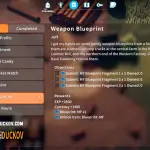
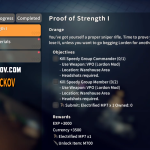
- Speedy Group Commander: A named yellow-clad boss that leads sprinting patrols. He spawns in the central Western Factory (near the inner farm compound). His squad moves fast, so engage with caution. He drops valuable loot (blueprints, parts).
- Lordon (Sniper + Dog): A long-range sniper boss accompanied by an armored dog. He can spawn anywhere on the map, but common sightings are around the Western Factory, the East Road (crossroads) Camp, or the canyon houses to the south. Listen for sniper shots and watch for his dog. He wields a VPO-101 rifle (one-shot danger).
- Regular Patrols: Expect groups of 3–5 scavenger ducks (SMGs or assault rifles) roaming camps and the factory. They often carry armor. Clearing the map means fighting multiple squads. Use high cover and vertical angles where possible.
- Extras: Yellow squads and mercenaries may ambush near the Gas Station or Lumber Mill. Consider checking corners and windows before advancing.
Tactical Tips
- Bring Explosives: A grenade or dynamite is mandatory. Both for opening the cracked wall and for clearing clusters of boxes quickly.
- Gas Mask: Carry one if you plan to unlock the Ravine cellar; the tunnel is toxic.
- Key Case: Equip a key ring to collect multiple keys. There are two rare “Cellar Keys” needed for quests (found in jackets, cabinets), so saving space is crucial.
- Alternate Travel: If you’ve activated the beacon, spawn via the hideout wormhole to instantly arrive near the Warehouse entrance. This shaves off the Ground Zero trek.
- Backup Extract: Always have a second extract in mind. If your primary exit (e.g., Gas Station) is contested, know where the Lumber Mill or other roads are.
- Stay Mobile: Avoid camping indoors. Use windows and roofs to monitor streets – controlling height makes defending against rushes easier. If you need to loot a high-value container, wait until the area is clear.
- Sell or Stash Quickly: This map yields mid- to high-tier loot. Before extraction, offload ultra-rare blueprints or weapons at vendors (the furniture store or any open shop) to avoid losing them on death.
Mastering the Warehouse Area comes down to systematic clearing and route planning. Prioritize clothing containers and high-value crates first, while avoiding getting pinned by the Speedy Commander or Lordon’s dog. By using a loop that hits the Western Factory and the eastern camps, you’ll maximize loot. With enough runs and preparation, the Warehouse Area can yield great gear and quest progress. Keep moving fast, and use the tools (grenades, gas masks, keys) you’ve gathered to dominate this map.
Advanced Tactics (high-ROI plays)
- Rooftop control: Gain observation and kill angles across yards; use it to pressure factory entrances.
- Forced extraction timing: When you obtain a high-value item, start moving toward extraction with one teammate covering. Don’t linger in the factory after big finds.
- Dog first approach: Against sniper bosses with dogs, isolate and kill the dog before focusing on the sniper to reduce lethality.
- Fake retreat: If pinned in a corridor, do a staged retreat to lure AI or enemy players into a grenade kill zone.
- Split-clear technique: Two-man teams move in opposite directions through large buildings — reduces crossfire and increases clear speed.
FAQ — Practical Questions & Answers
A broken wall on the west edge of Ground Zero blocks the path. You must use explosives (dynamite or grenades) to blow the wall and clear the route. From the bunker’s main entrance, take the left fork at the crossroads and follow the forest trail north until you find the cracked wall. Place your explosive on the prompt, back away, and detonate to open the passage. (If you obtain the Western Factory access key, you can instead enter through the locked north gate without blowing the wall.)
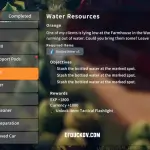
The Teleport Beacon is a one-time, activatable beacon that enables fast travel from your hideout. First, build the Teleporter at the hideout (as your base progresses). Then, in-raid, locate the Warehouse beacon – it’s beside the Gas Station extract on the east side of Warehouse. Interact to activate it. After activation, you can teleport to Warehouse from your hideout anytime, saving the long trek. (Remember: activating the beacon doesn’t extract you automatically; you still need to run to an exit. But it lets future runs start in Warehouse immediately.)
Keys drop randomly in Warehouse loot. Focus on high-chance containers: jackets/coats on walls, cabinets, safes, toolboxes and ammo crates often hold keys. Always loot bodies and civilians you clear – keys can spawn on corpses. The generic “Cellar Key” (needed for the hidden secret doors) is rare; if you need it, repeat runs focusing on these containers and check the Black Market (the key may appear for purchase between raids). (Note that related keys like “Cellar Fence” or “Cellar Crossroads” do not open the hidden cellars.) In general, there is no guaranteed fixed location – just keep searching high-yield spots and refreshing vendors.
Gas Station (east) and Lumber Mill (southeast) are reliable. If contested, have a secondary extract in mind; don’t tunnel-vision on one exit.
Avoid direct head-on fights unless prepared. Flank, use cover, or take an alternate route. If forced to fight, eliminate the boss’s support (dogs, heavies) first and use grenades.
Yes, but with caution. The Factory contains the best loot but also draws bosses and squads. Solo players should clear methodically and extract early once key or high-value items are secured.
Medical crates are often around road camps and near the Gas Station. Ammo boxes concentrate in the Western Factory, behind trucks, and near workshop benches.
The Ravine cellar contains toxic gas — bring a gas mask. Also, be mindful of long sightlines where snipers can dominate; avoid moving through open fields without cover.
Expanded Conclusion – Strategic Priorities
Warehouse is a high-reward, high-conflict map that rewards preparation, route discipline, and knowledge of high-value containers. Your checklist for a successful run:
- Prepare correctly: explosives, medkits, gas mask if hunting cellars, adequate ammo.
- Activate the Beacon: do it on your first run to enable fast future runs.
- Loot smart: prioritize jackets for keys, ammo boxes for combat readiness, and safes/toolboxes for rare items.
- Control verticality: roofs and windows provide decisive sightlines.
- Handle bosses on your terms: take out helpers first and never fight a boss in a compromised position.
- Extract promptly after major finds — the map’s compactness means danger can escalate fast.
Run Warehouse like a surgical raid: enter with a focused objective, clear methodically, grab the high-value targets, and exit before attrition or reinforcements turn the advantage. For both new players and veterans, consistent success comes from repetition, learning the container patterns, and respecting the danger zones — especially the Western Factory.