The Speedy Group Commander is a named boss that leads the fast-moving yellow squads on the Warehouse Area map. This encounter is a mix of mobility and timing: you’re not facing a slow, tanky boss so much as a leader who coordinates sprinting groups that punish sloppy positioning. This guide gives a clear, copy-ready breakdown for beginners and veterans alike – where to find him, what he drops, how he fights, and how to get the most value from each run.
Quick facts
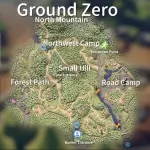
- Map / common spawn: Warehouse – Factory Zone (near the central walled farm compound).
- Encounter style: Roaming leader of a fast yellow squad (sprinting duck units).
- Typical equipment: Electrified MP7 (or similar SMG behavior) and nearby units often have Armor Lv3 on some spawns.
- Notable drops: High-value weapon blueprints (AK-103 blueprint listed among possible drops) and other weapon parts.
- Quest tie: Appears in Xavier / challenge quests as “Challenge: Speedy Group Commander – Kill Speedy Group Commander x1.”
Where to find the Speedy Group Commander (spawn & patrol logic)
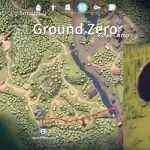
- The most reliable place to look is the Factory Zone inside the Warehouse map, commonly around the walled farm compound near the center – this area frequently hosts the yellow squads and their leader. If you don’t see him immediately, scan for groups of sprinting yellow enemies; the commander leads those formations.
- He roams with his squad – the encounter is more mobile than static. That means checking adjacent routes and courtyards rather than expecting a single fixed lair.
Pro tip: Use long sightlines and audio cues (footsteps/sprint sounds) to spot the group before they see you. Early detection lets you choose whether to engage, flank, or simply track the squad for a later opportunity.
Behavior & combat patterns
- High mobility, coordinated attacks: The commander’s strength is not just his own weaponry but the speed and coordination of his squad. If you get tunnel vision on the commander, the surrounding sprinting units will punish you.
- Burst windows: The leader’s pattern often includes short aggressive bursts followed by repositioning; use those small windows to heal or stack damage.
- Armor & suppression: Spawned units commonly include armor-equipped guards that can soak damage; prioritize targets intelligently to avoid being flanked or suppressed.
Best tactics – how to beat him reliably
General strategy: See the group – isolate the commander or thin the squad – then finish the leader quickly and extract.
- Scout and decide: If you spot a full squad, consider baiting them into chokepoints (narrow alleys, doorways) where they lose some movement advantage.
- Clear or split the squad first: Use flashbangs/smokes or throwables to separate the leader from the bulk of runners. Removing or distracting 2–3 runners makes the commander much easier to handle.
- Use mid-range controlled fire: An accurate mid-range assault rifle with AP/high-penetration rounds lets you deal with armored runners and the commander without getting into messy close combat.
- Play the windows: The commander will reposition after bursts – use those breathing spaces to heal, reload, or push for loot.
- Don’t chase into open roads: The squad’s mobility is a trap – chasing a fleeing commander across open ground invites flanking and ambush.
Beginner loadout (safe):
- Primary: Stable assault rifle (AK/AR class) with AP rounds.
- Secondary: Compact SMG or shotgun for close surprises.
- Gear: Level 2–3 armor, 2–3 medkits, and at least one throwable (flash or frag).
Veteran loadout (speed runs):
- Primary: High-DPS rifle or marksman rifle for quick headshot bursts.
- Utility: Smoke/flashes to split groups, fast-healing consumables for aggressive reentries.
Loot & rewards – why you hunt him
- The Speedy Group Commander is a reliable source of valuable weapon blueprints and weapon parts; notably, the AK-103 blueprint has been reported in his drop table. This can accelerate weapon crafting and trader unlocks.
- Because he’s tied to challenge quests, killing him often yields quest XP and currency, making targeted runs efficient for progression.
Loot tip: Bring a spare inventory slot specifically to carry blueprints or a high-value component – looting and extracting is the objective; don’t get greedy.
Quests and achievements
- The commander is explicitly referenced in Xavier’s quest line (Challenge: Speedy Group Commander), where you must kill him to complete the challenge and unlock the related rewards-prioritize this run if you need the quest rewards or weapon unlocks.
Farming strategy (repeatable runs)
- Economy-minded loadout: Use low-cost guns with decent performance to keep repair/replace costs down while maintaining kill efficiency.
- Stagger runs: Boss spawns and reset windows can be competitive – avoid camping the same spot constantly; learn respawn cadence and rotate to other objectives between attempts.
- Extraction planning: Plan your escape before you begin looting – the best loot only matters if you can extract with it.
Common mistakes to avoid
- Rushing the group without crowd control. The squad’s speed turns a rushed approach into chaos.
- Chasing a fleeing commander across open ground. You’ll often trade one controlled fight for multiple ambushes.
- Not bringing a carry slot for blueprints/rare items. Looting without extraction planning is a common loss.
FAQ
Most commonly in the Factory Zone of the Warehouse map, usually near the central walled farm compound; watch for the sprinting yellow squads as your cue.
He’s commonly associated with an electrified MP7-style loadout and spawns with armored runners around him. Treat him as an SMG-equipped leader with mobile support.
Yes – he drops useful blueprints and is tied to challenge quests; profitable if you run efficient extraction routes.
Conclusion
The Speedy Group Commander is a high-value, mobility-centric boss on the Warehouse map whose primary danger comes from the speed and coordination of his squad rather than raw single-target tankiness. Find him in the Factory Zone (look for sprinting yellow groups), isolate or split his squad, use mid-range controlled fire and crowd control, and always plan extraction before you loot. With the right tactics and a modest investment in armor and supplies, Speedy Commander runs are an efficient way to secure blueprints, quest progress, and valuable parts.