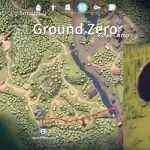
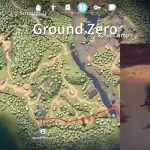
Ground Zero is built around a tight urban-industrial footprint: narrow streets that force close-quarters engagements, small plazas that act as frequent choke points, and a handful of larger POIs (warehouses, a broken bridge with a camp area, clustered shops and restaurants, and vehicle/debris zones). The map’s design rewards quick decision-making: you either clear areas fast and extract, or you overstay and get caught by other players or patrolling NPCs.
Key characteristics:
- Compact footprint: Quick runs are possible; nothing is far from extraction, but encounters happen fast.
- Verticality: Rooftops, second-story windows, and ladders exist in key areas – players use these to dominate streets and hold funnels.
- Mixed indoor/outdoor combat: Interiors favor short weapons and grenades; streets favor mobility and situational awareness.
- Loot clustering: High-value spawns are concentrated in specific POIs rather than evenly spread – learning those clusters is the core of efficient runs.
Detailed Map Geography & Landmarks
- Safehouse / Bunker Area: Usually a central or semi-safe starting zone. It’s where players gear up and can act as a pivot for initial rotations. The safehouse often has a vending machine or vendor options if unlocked.
- Warehouse Complex: The largest interior zone – multi-room, with workbenches, toolboxes, and safes. Expect tougher NPCs and contested player presence. Good for parts and circuit boards.
- Broken Bridge & Campfire Encampment: A small outdoor POI with a supply crate or tent clusters. This area frequently hosts mission items and is often a mid-raid hotspot.
- Shops & Restaurants Ring: Dozens of small rooms and counters make this a lucrative fast-loot loop. Great for consumables, meds, and occasional higher-tier items.
- Vehicle Piles & Junk Heaps: Clusters of cars, dumpsters, and debris. Excellent places for hidden items (watches, keys) and often near alternate exits or sewer-type connectors.
- Rooftops & Overwatch Positions: Accessible roofs and high windows offer vantage advantages and control over lane movement – crucial for team tactics.
- Cave / Underground Entrances (if present): Smaller, dangerous zones with ambush potential and unique loot but poor escape routes.
Loot Distribution – Where to Look & Why
- Clothing containers (jackets, backpacks): High probability for keys and small quest items. Always scan pockets first on a key run.
- Toolboxes / Workbenches (Warehouses): Source of crafting parts, circuit boards, and mid-tier gear.
- Supply crates (broken bridge/camp): Often tied to quests and can contain tradeable items – high value when present.
- Shop counters & restaurant shelves: Fast money and consumables; excellent for quick extractions.
- Dumpsters & car trunks: Low-effort spots that can yield keys and pocket loot – frequently overlooked by players focused only on interiors.
- Hidden ground/dig spots: Some map spots show visual cues for ground rewards. Carry a shovel for extra-value runs.
Keys – Types, Spawns, and Uses
Keys are some of the most lucrative single items because they open locked containers or safes with high value. Key information for Ground Zero:
- Types you’ll encounter: General-purpose mechanical or warehouse keys, small house/storage keys, and special quest keys. Some keys are buyable from vendors if the safehouse economy permits.
- Spawn locations: Jackets, backpacks, dumpsters, and vehicle piles are the most consistent sources. Patrols and NPCs can also carry keys.
- High-value targets to use keys on: Warehouse safes, locked cabinets in large POIs, and quest-specific containers (for items like pocket watches or circuit boards). Always plan your route to a locked container if you carry a key.
- Key-run tip: Reserve two inventory slots for any keys and immediate loot; make the first sweep through clothing containers and dumpsters to maximize key acquisition early.
Spawns & Enemy Behavior
- Player spawns: Players typically appear around safehouse or spawn clusters and fan out quickly. Early minutes are high-traffic.
- NPCs & Scavengers: Patrols concentrate around camp areas and defensive POIs like warehouses and workshops – expect both roaming and static guards.
- Common engagement zones: Streets between the shop ring and warehouse, the broken bridge approach, and rooftop-to-street sightlines.
Extraction Mechanics & Considerations
- Visible-extract markers: Many extractions are signaled by visible markers such as smoke or beacons. Be aware of timers and extraction activation mechanics (some require interaction or specific items).
- Alternate extracts: Always identify two extract options-primary and backup – because contested extractions are common.
- Quest-locked extracts: Some extracts may only activate if you’re carrying or using a quest item. Keep track of quest requirements before committing.
Rotations & Route Examples
Fast loot rotation (safe, high consistency)
- Spawn → sweep immediate safehouse area →
- Shop & restaurant ring (fast interior sweeps) →
- Nearby warehouse/toolbox quick check →
- Broken bridge/camp supply crate → extract.
Key-farm rotation (targeted)
- Spawn → clothing container loop (jackets & backpacks) →
- Dumpsters & vehicle pile sweep →
- Warehouse/toolshop check for safes → extract if keys/quest items obtained.
Aggressive/Team rotation (high-risk, high-reward)
- Rooftop control to secure sightlines →
- Coordinated team entry to the warehouse and camp →
- Rapid loot rush to high-value caches → planned extraction with overwatch.
Gear & Loadout Recommendations
- Solo Key Runs: Light armor, silenced pistol or SMG for mobility, extra meds, and a shovel for dig spots. Two spare inventory slots reserved for keys and quest items.
- Solo General Runs: Balanced loadout with medium armor if you expect PvP; prioritize speed if you plan to avoid long fights.
- Team Runs: One overwatch (sniper or marksman) on rooftops/windows, two fast clearers with assault/SMG combos, and one dedicated looter who prioritizes containers and keys. Use smoke/grenades to clear interior rooms.
Sound, Stealth & Environmental Tips
- Sound cues: Footsteps in tight corridors and door openings are loud – use sound to detect approaching players. Listening for container interaction sounds (jacket rummage, container opening) can reveal nearby looters.
- Stealth approach: Use door peeks and quick clears – don’t sprint through rooms unless you know the layout is empty.
- Environmental hazards: Debris and rubble can slow movement; avoid getting trapped in tight corridors without a clear exit.
Advanced Tactics & Secrets
- Vertical denial: Control high windows and ladder approaches to dominate street movement and force enemies into predictable routes.
- Fake-extract baiting: If you spot players trying to extract, consider suppressing the extract while a teammate secures loot – timing and patience win more than brute force.
- Layered looting: Clear one POI fully, then push the adjacent POI while enemies are likely distracted. Chain clears reduce the chance of surprise flanks.
- Adaptive inventory: Swap heavier loot for lighter, high-value keys or quest items if extraction looks risky.
FAQs
Ground Zero is excellent for beginners who want quick runs and steady progression, but its high traffic also rewards map knowledge – experience helps avoid early deaths.
Clothing containers (jackets, backpacks) and dumpsters are the most reliable for finding keys.
Keys significantly increase the chance of high-value loot, but aren’t a guaranteed jackpot – some locked containers give mid-tier gear or quest items.
Memorize at least two extracts (primary and backup). Contested primary extract points are very common.
Generally, no for fast-loot or key runs. Light or medium armor is optimal; heavy armor slows you down and makes you an easier target in tight spaces.
Warehouses are most contestable; if you see rooftop control or hear multiple footsteps, delay entry – clear rooftops first where possible.
A well-executed run can be 5–12 minutes depending on objectives. Key runs may take a bit longer due to container searching.
Yes – patrolling NPCs and guarded POIs can drop keys and quest items upon defeat.
A shovel is very useful for digging treasure spots that often hide valuable components.
Use distraction: one player suppresses while another sneaks to the extract; otherwise, wait for a clear window or use smoke cover.
If a key is available for purchase and you have the cash, buying can be faster and safer than farming – especially for time-sensitive quests.
Approach rooftops via alternate routes, use smoke to cover rooftop approaches, and clear windows before crossing exposed areas.
Conclusion
Ground Zero rewards preparation, speed, and map knowledge. Its compact design makes every decision count — a single misstep can cost a run, but smart routing and container prioritization make it one of the most efficient maps for progression when played correctly. Focus your early runs on clothing containers, dumpsters, toolboxes, and the broken bridge supply crate. Keep mobile, control vertical angles when possible, and always plan an alternate extraction. With those principles, Ground Zero becomes not just a map to survive, but a map to profit and progress from.